How to Make Useful iNaturalist Bee Observations
You may have already heard of iNaturalist, or other ‘citizen science’ aggregation sites such as bugguide.net or eBird. Traditionally, scientific research on wild organisms included costly and time consuming data collection surveys, performed by scientists (often helped by their students) which include cordoning off various-sized sections of land (or water), splitting the survey area into transects, then laboriously cataloging every living thing encountered (or a subset of living things as determined by area of interest). While this method does generate good data, the geographically-specific and labour-intensiveness of it is not largely scalable.
Enter citizen (a.k.a. community) science! This relatively new approach to data collection is a collaboration between scientists and keen citizens who report the species they see close to their own homes, or wherever else they may go. Probably the best known citizen science project is the Christmas Bird Count, initiated by ornithologist Frank Chapman which has taken place every winter since 1900.
iNaturalist started as a Master’s thesis project by three students at the University of California, Berkeley. As of 2023, iNaturalist has reached 150 million verifiable observations and has over 350,000 active users world-wide. It collects photographic and auditory observation of all living organisms. While the structure of iNaturalist does include some inherent biases, scientists can account for these biases, and use iNaturalist data in their research which affords them a great deal more data than traditional surveys.
We like iNat because it has matured into a single platform where we can post observations, view observations with great specificity using the provided filters, and all the difficult ‘back end’ infrastructure is hidden, leaving end-users with a clean, simple interface to collect and view biodiversity data. iNat includes great features such as ‘projects’, which allow users to create a simple interface into a subset of data that interests them. We use iNat projects to aggregate the data for our bioblitzes. A bioblitz is an event that takes over a prescribed period of time and place where participants make and document observations of living organisms.
This is where we need your help! There are over 500 native bee species in British Columbia, and many of them are still relatively under-studied, and under-represented. The more eyes we have looking for bees, the more likely we are to find rare species. This guide is a resource to help you become a good community scientist, and collect and post good, useful observations.
Create an account
If you don’t have one already, the first step is to create an account. Navigate to https://www.inaturalist.org/ and click on ‘Sign Up’. You will be asked for a username, email address, and password. After you confirm your email address, you can log in. This is a good time to fill in some profile information, as little or as much as you are comfortable with. Please note that you must be 13 years old or older to create an iNaturalist account (this is because of US law which governs where the iNat servers are located). For kids younger than 13, we suggest making an account to be stewarded by parents or guardians.
We suggest having a look at the iNat Getting Started guide, which will quickly get you up to speed on what iNat is, and how it works. There are also some great Video Tutorials available as well.
What about the app?
iNat does have an app available for both Android and Apple devices. If you intend to use your phone’s camera to record your observations, installing the app will make uploading them much easier. If you intend to use a standalone camera, then the app is not necessary. Even if you do intend to use your phone, we do not recommend using the app alone. It does not have a full interface to iNaturalist, and many tasks can only be accomplished using the web interface. So go ahead and install it if you wish, it certainly won’t hurt, but please do use the web interface as well.
So what is an ‘observation’, anyway?
Simply put, an observation is photographic or auditory evidence of the presence of a living organism. Since bees and plants do not emit identifiable sounds, we will focus solely on photographic observations here. iNat has three categories of observations: Casual, Needs ID, and Research Grade. Casual observations are just that, casual. They cannot be used for science or research. Casual observations do not even necessarily require a picture. Their utility is for those who keep lists of the organisms they encounter. Sometimes, it is not possible to get good photographic evidence, but you may still want to note that you saw something. A casual observation will add that organism to your iNat ‘life list’, while excluding it from the observations used for research. A casual observation can also be used to keep track of domestic animals, or cultivated plants.
It is the last two categories of observations we are interested in for the purposes of this project, and they are both closely related. iNat requires that observations used for research are only of wild organisms, as opposed to domestic, and non-cultivated plants, ie: those that grow wildly without the aid of humans. When you first upload an observation, it will be categorized by default as ‘Needs ID’. The observation will need several things to keep it from being downgraded to Casual: it needs to have photographic evidence, it needs to have a date and time that the observation occurred, and it needs an accurate physical location where the observation occurred. Once posted to iNat, community members will find the observation, and attach an identification to it. If and when the observation receives two identifications at the species level, the observation will be promoted to ‘Research Grade’. Sometimes, with some organisms, the identifications can be difficult, or even contentious. If there is disagreement on the identification, then it may not reach research grade. Even if there are dissenting identifications on the observation, if two-thirds of the community members who have added identifications agree to the level of species, the observation will be promoted to Research Grade.
Heading out into the field
So with this background, it is time to head outside and collect some observations! If you have a camera you are comfortable with, it may be easiest to use that. If not, you can use your cell phone camera. It is not necessary to drive out into the wilderness to collect good observations. You can start by taking a stroll through the neighborhood, or even in your own backyard. Once you’ve had a bit of practice you’ll be ready to head for the parks. It should be noted that bees tend to hide in rainy, inclement weather. You may find you have considerably better luck locating bees on a nice sunny day. Bees are more likely to be out and about on the warmest part of the day while the sun is shining.
Bees need flowers, and so wherever you see a volume of the kinds of flowers bees love, you will find bees. Flowers in the aster family that have a daisy-like shape are a good place to start. Especially since bees often spend some time circling around the center of the flower sipping up nectar from the tiny florets. A community garden, botanical garden, or city park is a great place to start. Try to find a place with flowers fully in bloom. If you have a garden in your yard you can find the “hot spots” where the bees like to visit and spend some time there with your camera. Experiment and have fun. Try getting closer and closer to the bee as you are taking photos, moving your body to photograph different angles. Sometimes you’ll find yourself “chasing” bees, and sometimes they’ll come to you if you stay nice and still. Be prepared to squat and kneel if you are able to get down to bee level. Try focussing on the eye of the bee to get a clear shot.
When you’re in a provincial park you’ll have the opportunity to look for bees in wildflowers. Try taking walks at different elevations to see the biodiversity of bees in different blooms. Please stay on the trails and photograph bees in the shrubs and wildflowers that you can reach without risking stepping on any plants. The habitat can be especially fragile in the alpine and subalpine. You’ll also see bees on weedy lawns and in ditches.
After locating some flowers with bees buzzing about, it is time to attempt to get some pictures. If you have a DSLR or mirrorless camera with a macro lens, you probably already have a good idea what you are doing. I have also had good luck capturing bees and insects using a telephoto lens, which allows you to keep a bit of distance and avoid disturbing it. Most camera phones these days will have a macro or close-up mode, which will allow you to get quite close and capture better shots.
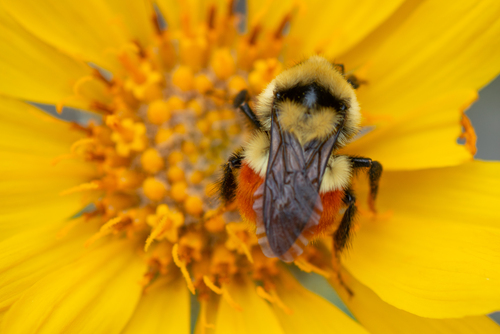
You will need to exhibit a bit of patience here. Bees are wild creatures, and they may not always want to sit still for you. Your presence may disturb them, and cause them to fly away, particularly if you move quickly or cast a shadow over them. At other times, they may not seem to be disturbed by your presence at all. The key is persistence. Oftentimes, you may only be able to get one or two quick pictures before they fly off. In this case, just do the best you can. If the bee seems not to be disturbed, and happily flits about collecting pollen, then you may be able to be a bit more systematic. Given the time and space to collect multiple shots, the most helpful angles for identification are:
- Side view
- Top-down view
- The face
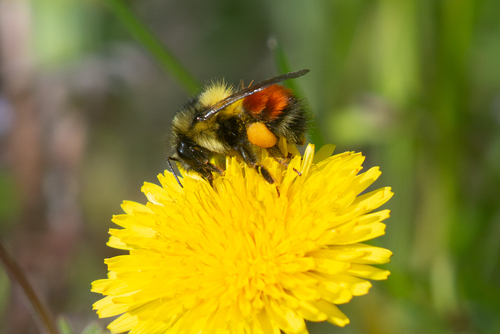
Bombus melanopygus - side view
Bombus huntii - top-down view

Bombus vosnesenskii - face view
At the end of the day, a good strategy is to get as many different angles as possible. Be cognizant of your body position in relation to the sun. If possible, position your body so you are not shading the bee and flower. Pictures taken in full-sun will often be better.
If you are using your phone, you may be tempted to upload your observations as soon as you make them. We would discourage this practice. It’s ultimately up to you, but we find it works better as two distinct steps. If you are spending too much time looking at your phone while out in the field, you are likely to miss some good bees. And if you wait, you can do the uploading later at home, while enjoying a nice cup of coffee or tea, or a cold drink with a piece of pie as reward for your hard work.
One of the most important elements when researching bees is the plants that they forage on. Some bees are generalists, and will happily collect from many different types of plants and flowers. Other bees are specialists, and will only forage on specific plants, or families of plants. For this reason, we encourage people to make note of which plant the bee was associating with, and to add this information as an annotation on the observation (more on how to do this later).
If you know the name of the plant you saw the bee on, great! If not, you can take pictures of it, upload those as an observation, and let the community ID it for you. Generally, three photos should be enough to get a good ID on a plant. Take a wider shot of the plant in situ, then put your phone into macro mode and take one close-up shot of the flower or flowers, and one close-up shot of the leaves.
Uploading your first observation
So after taking some pictures of the bees and plants, it is time to upload them to iNaturalist. Note that when you upload it should be one organism = one observation. If you took multiple photos, they should not be uploaded into multiple observations. You can combine multiple photos into one observation.
Using the web interface
If you used a ‘real’ camera to capture your observations, you will need to move the files to your computer using your normal method. While a bit of post processing is OK, we suggest not getting too out of hand with this. You don’t want to overtly change the colours or appearance of the organism. It is OK to use software to increase detail in the shadows. Also, it is helpful if you crop your photos tightly around the subject, to make the details easier to see.
When your jpg files are ready to upload, open iNaturalist and ensure you are logged in. Click on the green ‘Upload’ button on the header at the top of the page. From the next page you can either drag and drop your files, or click the blue ‘Choose files’ button which will open a dialog allowing you to search your filesystem. At this point, go ahead and select all the files you want to upload in one shot. You can group them into observations in the next step.
Your screen should now look something like this. Here I have six photos of two different bees. Note that iNat has read the time and date information directly from the photo’s EXIF data. Do make sure that your camera has the correct date and time set before heading out!

The iNat upload web interface
Since there are only two different bees here, we need to combine the photos into two observations. You can do this by dragging and dropping the photo thumbnails. Choose the best picture, and drag the lesser photos on top of it, and they will combine. Do make sure all combined photos are of the same bee. If you accidentally combine two different species into a single observation, the community identifiers will get confused, and likely ask you to separate them. After combining the photos, your screen should look something like this, you can see that one observation has two photos, and one has four pictures.

Combining multiple photos into one observation
Now it is time to add the location. It is best to get this as specific as possible. Click on the ‘Location’ field for each observation and a map will pop up. Zoom in on the place where you took the photo, then click to place a pin. Do the best you can here with accuracy. If you are only able to find the general area where you observed the bee, you can pull the edge of the red circle to enlarge it until you are reasonably sure the location where you took the picture is covered. Now click the blue ‘Update Observations’ button. Continue this process for all your observations. The second time you do this per upload, the map will default to your last location, speeding up the process. This is why it is a good strategy to only upload observations made in one general location at a time.

The location mapping interface
Now it is time to add your initial identification. If you already know what this is, great, just click on ‘Species Name’ and type it in. You can search by common name or scientific name, and iNat will use auto-suggest completion to help you here. If you have no idea what the identification is, there are two things you can do. First, iNaturalist uses ‘Computer Vision’ (ie: machine learning) to auto-suggest a taxon based on your photo. This is helpful, but it can be fairly hit-or-miss concerning accuracy. In general, it is best to use the least-specific taxon that is suggested, which is usually a genus or family. Second, if you know it is a bee, but not sure which species of bee, you can just type in ‘bees’. If you know it is a bumble bee, but not which, you can type in the genus ‘Bombus’.

The CV suggestion. In this case, we recommend choosing ‘Common digger bees’ at the top
The community identifiers can take it the rest of the way
After adding a taxon for all your observations, you can finally hit ‘Submit Observations’, and your observations will be official. This is a good time to annotate the bee observations with their associated plants. To do this, you will need to view each observation page in the web interface. On the right of the page, towards the bottom you will see an “Observation fields” text box. Click on this, and type “Name of associated plant”. After doing this, another text box will appear which will allow you to add the name of the plant you found the bee foraging on. Again, you can type in the scientific or common name of the plant. And again, if you only know the genus or family of the plant, just add that for now. If you have absolutely no idea, add the plant photos you took as a separate observation (you did take pictures of the plant too, right?) and wait for it to be identified, then add the annotation.

Annotating the observation with ‘Name of associated plant”
Uploading observations using the app
If you captured your observations using your phone, you will want to upload them using the iNat app, to save from having to transfer the files to your computer. You can only upload one observation at a time using the app. Open the app, and ensure you are logged in. On android, press the green ‘+’ button at the bottom of the screen. From the popup, press ‘Choose Image’, then press ‘Gallery’ and select ALL the photos you want to include in the observation. On iPhone, tap on ‘Observe’, then press ‘+’ and select one or more photos.
Notice that both the time and date, and the location have been automatically filled in. If the location information is not filled in, you may have to adjust your permissions to allow the app access to your location. Now you can click on ‘What did you see?’, and fill in your initial identification as explained above.
Now, press the green check mark, and your observation will be posted to iNat! Don’t forget to log into the web interface when you can, to add the ‘Name of associated plant’ annotation. It is not possible to add these annotations using the app.
2024 Summer Bee Bioblitz
This guide was created specifically to help people get started who want to participate in our Summer Bee Bioblitz at Kokanee Creek, E.C. Manning, and Blanket Creek Provincial Parks. We hope you are able to visit one or more of these parks between June 1, and August 31, and spend some time looking for bees. We also cordially invite you to attend one of our three in–person events, where we will talk briefly about the importance of native bees and other pollinators, before leading a ‘bee safari’ walk for a hands-on example of how to collect observations. These events will take place:
Kokanee Creek PP: Sunday, June 16. 1pm start time. Meet spot is the Nature Center.
E.C. Manning PP: Sunday, July 28. 1pm start time. Meet spot is the Strawberry Flats parking area.
Blanket Creek PP: Sunday, August 4. 1pm start time. Meet spot is the historic homestead site, just south of the campground.
Please dress for the weather and avoid wearing heavily perfumed products. Dogs and other pets tend to scare the bees away, so please leave them at home during these walks.
Through our partnership with the BC Parks Foundation, we have limited this particular bioblitz to these three BC parks, however, we know not everyone will be able to make it. We would still encourage anyone, anywhere in British Columbia, to get outside, enjoy some fresh air, and collect some bee observations. While they will not end up in this particular project, they are still incredibly useful, and they will be collected in the Native Bee Society of BC’s BC Bee Tracker project, which is ongoing, and collects bee observations from anywhere in the province.
Next steps
Ultimately, our goal is to get people outside in nature and have fun while collecting bee observations. There is nothing wrong with being a casual bee-spotter, and getting out there when you can. Some of you, however, may catch the ‘bug’, and want to find out more about native bees and pollinators, and the plants that sustain them. For those of you who want to dig deeper, we have provided a few resources to get you started. Here are a few online guides, and books to help you take that next step.
For beginners: https://borderfreebees.com/wp-content/uploads/2017/11/Common-Pollinators-of-British-Columbia-2nd-Edition.pdf
Resources on identifying BC bees:
https://www.bcnativebees.org/resources
Books on Native Bees
https://www.amazon.ca/Bees-Your-Backyard-Guide-Americas/dp/0691160775